How a Montana Fabrication Shop Became a Roxor Favorite
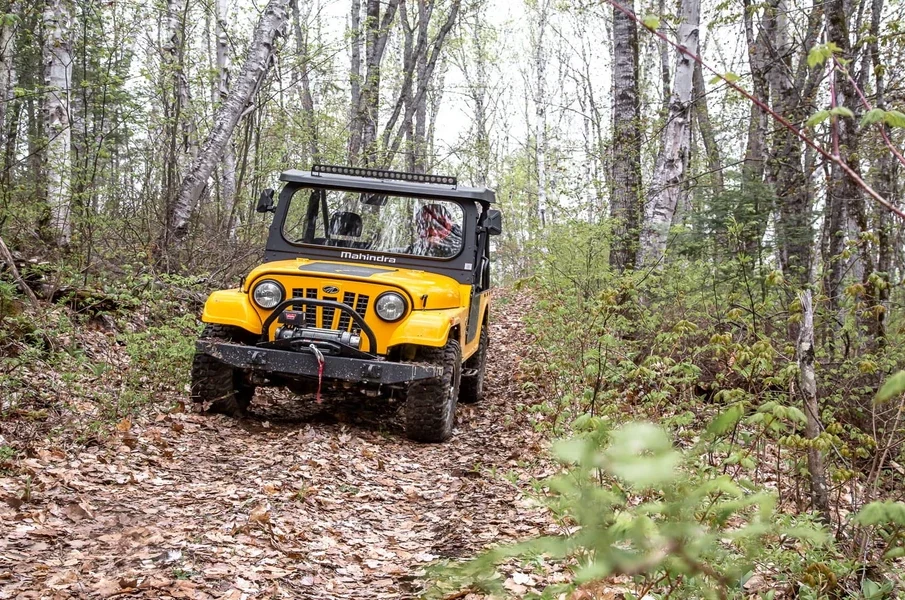
I pay close attention to shops that earn trust from demanding off-road owners. Results matter. Fit matters. Safety matters. One Montana team has checked those boxes with careful design and consistent output. I am talking about On The Rox Fabrication, a shop that turned Roxor upgrades into a complete and practical system.
You want clear reasons to choose a supplier and a path that makes sense for your build. I will lay out how this shop rose to the top for Roxor owners, why their parts hold up, and how you can pick the right upgrades without wasting time or money.
I chose these recommendations by looking at design intent, material choices, install support, and how parts work together across a full vehicle. My goal is to help you make smart decisions that set up your Roxor for work and trail use without constant rework.
The Montana Factor: Craft first, terrain second
On The Rox Fabrication operates under Westfab Custom Fabrication, LLC in Worden, Montana. That background matters. For years they have built street rods, drag cars, off-road race trucks, rock crawlers, and restoration projects. That mix trains a team to think about structure, heat, vibration, and service.
Montana also teaches respect for distance and weather. A failed part can cost a weekend or a workday. That mindset shapes the On The Rox approach to Roxor components. Strength, service access, and bolt-on clarity come first.
What pushed them to favorite status
From my view, five habits explain their rise:
- Purpose-built components for real loads, not shelf appeal
- Materials and thickness that handle rock hits and torsion
- Clean fitment that matches factory lines and hardware
- Install guides that reduce guesswork
- A catalog that covers a full build path, front to back
This mix cuts downtime. It also lets you plan upgrades in stages without clashing parts.
Parts that change daily use
Some parts win attention because they fix problems you feel on day one. Here are standouts I would put near the top of many lists.
- Rear quarter panel armor: Formed 3/16-inch aluminum that matches Roxor body lines, with options in bare or black powder coat. It shields a vulnerable section and keeps the body straight after side hits. It keeps stock taillights, which avoids extra wiring and delays.
- Turn signal harness conversion: A system built for the Roxor that uses a Truck-Lite 900 column switch with four-way function, LED signals, and the pieces needed for a clean tie-in to the factory harness. The design works with factory and aftermarket grilles. The instructions target a short install window, which helps if you need street-legal function for town runs.
- OESpectrum shock pairs: Tuned to smooth chop and reduce harsh rebound. These improve control on washboard and make long days less tiring.
- Black powder-coated side steps: Safer entry and exit, with added grind protection for the pinch seam area.
- Bolt-on receiver hitches: Useful for small trailers and shop carts. Bolt-on design keeps the install straight.
- Oil pan skid plates: A cheap insurance play for the underbody. One bad line can sideline a trip.
- Side mirrors and manual locking hub sets: Better visibility and manual control of the front axle when you want it.
- D-ring mounts, heavy-duty tire mounts, filters, washers, sport tops, and telescoping rack systems: These round out recovery, service, weather cover, and cargo needs.
You can build a full rig from a single catalog without chasing odd adapters or drilling unknown holes.
Protection first, then control, then comfort
1. Armor and skid plates
2. Drivetrain basics and hubs
3. Suspension and shocks
4. Lighting and wiring
5. Utility parts like hitches, racks, and mirrors
6. Comfort parts like tops, doors, and windshields
This order keeps the vehicle safe and moving, then adds control, then covers convenience. It also helps avoid redoing work under the vehicle after you add body parts.
Example build paths you can copy
Use cases drive parts. Start with your top two jobs for the Roxor and pick to match.
- Work-first Roxor
- Receiver hitch
- Oil pan skid plate
- Side steps
- Side mirrors
- Telescoping rack system
- OESpectrum shock pairs
- Trail-first Roxor
- Rear quarter panel armor
- Front and belly skid plates
- Manual locking hub set
- D-ring mounts and heavy-duty tire mount
- Lighting upgrade for night trail work
- Balanced daily hauler
- Turn signal harness conversion
- Windshield and sport top
- Side mirrors
- Side steps
- Cargo tray or rack
- OESpectrum shock pairs
These paths keep parts compatible and useful across seasons.
Why I recommend On The Rox Fabrication over other options
- Depth and breadth: Their catalog covers bumpers, sliders, armor, cargo, tops, windshields, engine and drivetrain upgrades, grilles, interior pieces, lighting, wiring, suspension, and skid systems. That makes planning smoother.
- Fabrication roots: Years of custom work guide their design choices, welds, and forming. You can see that in bracket alignment, hole placement, and hardware choices.
- Clear installs: Their guides walk through steps with the right order. You avoid traps like trapped fasteners or wiring strain.
- Compatibility: Their signal kit works with factory and aftermarket grilles. Rear armor keeps stock taillights. Those are smart choices that reduce backtracking.
- Material choices: Heavy aluminum for impact areas and powder-coated steel where structure helps. This keeps weight in check while guarding the body and driveline.
- Reliability focus: Parts aim to keep the vehicle on the trail or at work. That focus shows in skid design and drivetrain support.
- Real build examples: Featured builds show part stacks that make sense. You can borrow those sequences and avoid random shopping.
Install experience without stress
If you enjoy your own installs, you will like their approach. Steps come in a logical order. Hardware bags match the work. The turn signal kit targets a short install window and uses a column switch that feels natural to use. That keeps downtime low and keeps your plans on track.
A simple checklist before you buy
Use this list to tighten your plan:
- State the top two jobs your Roxor must handle
- Walk around the vehicle and mark first-hit zones for armor
- Check tire size and weight, then confirm recovery points
- Plan wiring paths before adding lights and signals
- Pick cargo and rack parts that match your longest item
- Confirm fit with doors, tops, and windshields you plan to add later
- Set an install order and schedule support time if needed
The bottom line
If you want parts that fit, protect, and work as a system, this Montana shop earns a close look. Their catalog covers the full Roxor, their guides cut install friction, and their design choices reflect real use, not shelf talk.
I suggest you start with armor and the signal kit, then move to suspension and cargo. That path gives you safety, control, and utility without guesswork.
On The Rox Fabrication built their name by solving hard use cases with clean parts. If your Roxor has to earn its keep on trail or at work, their approach fits the job.




-
What Causes Swirl Marks on Car Paint and How to Prevent Them
Introduction Step outside on a bright afternoon and look at a dark ... -
-
-
-